 Click on images to enlarge.
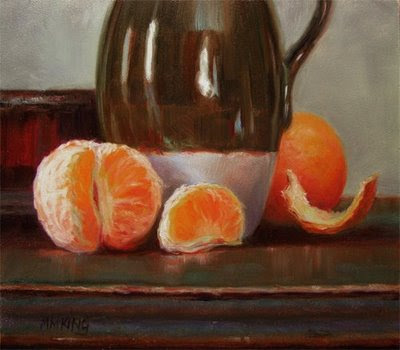
"Mandarins and Crockery"
6"x 7" Oil on gessoed hard board.
sold
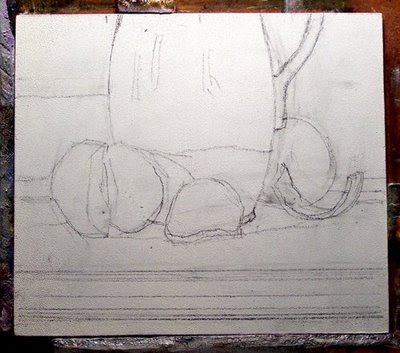
It’s been a while since I’ve taken WIP shots as I work. It really doesn’t take that much longer and I know I’ve benefited from and enjoyed viewing other artist’s work stages. So ... I thought I’d share these with you.
Over the past year I’ve experimented with many different approaches to my paintings. I had settled into first sketching the composition loosely with paint and brush. Then proceed to a monotone under painting, usually using transparent oxide brown. Occasionally I use a pencil sketch if a detailed drawing is required or the proportions are critical. This particular composition was dependent on achieving exact measurements. It took me several tries to make it work.
In this next step I changed my usual methods ( in this painting and also my last painting of the three eggs ). Instead of working out my values with the brown under painting, I skipped to color. I chose first thing the main color of each area and tried to paint the correct value of that color. Later I went back into each area and added the darker, lighter, cooler and warmer versions of each color within that shape. I was able to keep my colors much cleaner without an oxide brown grisaille mixing in. If the grisaille was to dry before painting in the color I would not have that problem but I work as close to "alla prima" as possible finishing a painting in one sitting or in two evenings. I work wet into wet from start to finish. I place my painting and palette into the freezer to keep it wet ...yep, it works.
Although the camera can’t represent it, the focal point of the painting is the top half of the upright orange section on the left. The light is glowing through the fruit section to a very intense orange. It looks almost neon in the original but this just doesn’t reproduce. The orange in the background is very clean in color but has a soft glow that recedes into the background. The photo warped at the bottom edge of the table and I couldn’t straighten it digitally. Oh, the limitations of the camera!
Note: I thought I’d create the "WIP Corner" in which to place all my work-in-progress demos. Now you can access these by clicking on that name in the categories list in the side column.


10 comments:
Marilyn, This one is awesome!!! Beautiful oranges! I love all the different shapes of each piece of orange, and the dark shiny crockery.. and your discription of your process is an added bonus. It's so nice to be able to read about someone else's experience of painting a certain piece. Thanks for taking the time!
Thanks so much, Debbie. I enjoyed sharing and am glad you appreciate it!
Marilyn,
Thanks for the WIP stuff. I'm sure that there are lots of "self-taught" artists like me that get those ah-hah! moments looking at someone else's works in progress. For example I would not have guessed that this piece required percision in the layout. Did you work from a photo? Or that french word that sounds like grisseaille, (the part where it all turns muddy). I really don't need new words for that.
Rick,
I'm a self taught painter too, just been at it a lot longer. University art degrees were not teaching oil painting or even representational painting back in the 70's.
Not all grisailles (tonal under painting) will produce mud. "Mud" is the term to use for mud. lol
I didn't paint from a photo so much as I use photos to work out my layout. I take lots of photos of my set up and on the computer choose the one I like best - lighting, angle, composition - and proceed to crop the chosen image in photoshop. This assures that I keep to the layout I have planned. Once those pencil or brush "maps" are laid down on the canvas or board, I can totally concentrate on the painting. This is not to say that I follow the photo exactly. I often move or delete elements or bring in something from another photo. The photos are just a measuring tool for me to work out the compositions.
Hope that helps to clarify.
Just beautiful Marilyn. I really enjoyed your description of the method you used here. I will try going in with colour as opposed to the dark underpainting on a subject such as this. Makes a lot of sense, and your result definitely underlines that. Theresa Rankin posted a great sequence by Jeff Legg that sends a similar message.
Vern,
I've just returned from your blog and love your girl on the beach painting. I can see where this is possibly a
"break through" piece for you. My journey is similar to yours in painting exact and somewhat tight and now being excited about loosening up and getting into the feel, flow, and life in the painting process and medium. My end result is still much tighter than I see in my head, but the process of change is at work.
It sounds like your workshop experience was wonderful and I hope to have as a rewarding result someday.
Thanks for your comments and we'll continue to learn from one another.
Just found you from the DSFDF site. Your work is wonderful - your drawing skills are amazing.
You did an AMAZING job, Marilyn!
Gorgeous painting! I loved seeing the steps you took to create it.
Carol, thanks for dropping by I enjoyed looking at your blog and great work on your web site. I absolutely loved your Valentine meatloaf (not a painting)!!!lol
Hi Edward, thanks so much for your generous words.
Post a Comment